Custom sublimation mouse pads are one of the most overlooked products in the craft business world — and one of the easiest to make. They press fast, ship flat, cost under $3 per blank, and sell for $15–$25 on Etsy. Whether you want to make personalized gifts or add a new product to your lineup, this complete guide walks you through everything from choosing the right blank to getting a flawless transfer every single time.
We also include a free mouse pad PNG design you can download and press today.
What You Need to Sublimate a Mouse Pad
Before we get into the step-by-step process, let’s make sure you have the right supplies. Using the wrong blank or the wrong paper is the number one reason beginners end up with washed-out, uneven results.
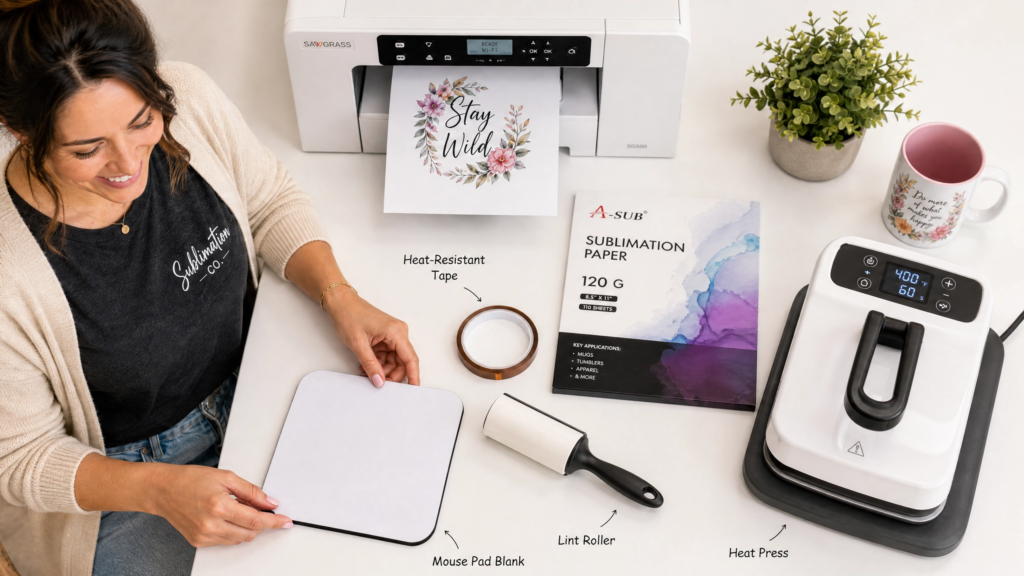
Supplies list:
- Sublimation mouse pad blank — must be polyester-coated or neoprene with a white polyester surface. Standard rubber mouse pads will NOT work.
- Sublimation printer — Epson EcoTank converted with sublimation ink, Epson F170, or Sawgrass SG500. Regular inkjet printers will not produce sublimation results.
- Sublimation ink — must match your printer. Do not mix ink brands.
- Sublimation paper — A-SUB or Hiipoo are reliable, affordable options. Standard copy paper will not work.
- Heat press — a flat clamshell or swing-away press. A 15×15 inch press comfortably fits a standard 7.75 x 9.25 inch mouse pad.
- Heat-resistant tape — to secure the transfer and prevent ghosting.
- Butcher paper or parchment paper — one sheet above and one sheet below to protect your heat press platen.
- Lint roller — essential for a clean surface before pressing.
- Infrared thermometer — optional but recommended to verify your press is reaching the correct temperature.
Choosing the Right Sublimation Mouse Pad Blank
Not all mouse pad blanks are equal, and this is where most beginners go wrong. Here is what to look for:
Surface color: The surface must be bright white. A cream or off-white surface will cause your colors to print with a yellow cast. Hold the blank up to a pure white sheet of paper before you buy — if there is any difference in whiteness, skip that blank.
Surface material: The printable surface must be polyester-coated. Sublimation ink bonds to polyester fibers — it cannot bond to cotton, rubber, or uncoated neoprene. Most sublimation mouse pad blanks are neoprene-backed with a polyester top surface. Always confirm this in the product description before ordering.
Backing color: Mouse pad blanks come with either a tan/natural backing or a black rubber backing. The backing color does not affect print quality — both produce identical results on the white polyester surface. The black-backed versions tend to feel slightly more premium.
Standard size: The most common sublimation mouse pad blank size is 7.75 x 9.25 inches. This is the size to use when setting up your design file. Extended gaming pad blanks are also available (up to 31 x 12 inches) and follow the same pressing process.
Where to buy: Amazon carries reliable blank mouse pads from brands like Vapor Apparel and Condé. Craft stores including Michaels sell the Make Market sublimation mouse pad blank which works well for beginners.
How to Set Up Your Design File
Getting your design sized correctly before printing saves you from wasting paper and blanks. Here is the exact setup:
Canvas size: Set your design canvas to 9.5 x 11 inches at 300 DPI in Canva, Photoshop, or whatever design software you use. This is slightly larger than the blank itself, which is intentional — printing a design slightly larger than your blank ensures full edge-to-edge coverage with no white borders.
Color mode: Work in RGB color mode, not CMYK. Sublimation printers are calibrated for RGB. Designing in CMYK will produce muted, inaccurate colors after pressing.
Mirror your design: This step is critical and frequently forgotten. Before printing, flip your design horizontally (mirror it). Since you press the printed side face-down onto the blank, a non-mirrored design will print in reverse on the finished mouse pad. Any text or logos must be mirrored before printing or they will read backwards.
Resolution: Always design and export at 300 DPI minimum. Lower resolution files print with visible pixelation after pressing.
Sublimation Mouse Pad Heat Press Settings
This is the most important part of the entire process. Using the wrong temperature or time is the cause of 90% of failed mouse pad presses — either colors are too washed out (too low or too short) or the blank warps and smells (too high or too long).
Standard settings for neoprene mouse pad blanks:
| Setting | Value |
|---|---|
| Temperature | 385°F (196°C) |
| Time | 50–60 seconds |
| Pressure | Medium — firm |
| Peel | Hot peel immediately |
These settings work for the vast majority of neoprene sublimation mouse pad blanks. However, always check the packaging of your specific blank — some manufacturers recommend 400°F for 40 seconds instead. Both temperature ranges produce good results; the key is consistency.
Why neoprene requires pre-pressing: Neoprene is a dense foam material that holds significantly more moisture than other sublimation blanks like polyester shirts or ceramic mugs. If you press a moisture-filled blank, that trapped water turns to steam during pressing and pushes the sublimation ink away from the surface, resulting in uneven, faded, or bubbled transfers.
Always pre-press your mouse pad blank before adding the transfer:
- Place the bare blank on your heat press
- Press at full temperature (385°F) for the full 50 seconds
- Open the press and check for steam rising from the blank
- If steam is still visible, press again
- Repeat until no steam appears
- Remove the blank and allow it to cool completely to room temperature before adding your design
This single step eliminates the majority of sublimation mouse pad failures.
Step-by-Step: How to Sublimate a Mouse Pad
Now that your blank is pre-pressed and cooled and your design is printed, here is the complete pressing process:

Step 1 — Lint roll the blank surface Even if the blank looks clean, run a lint roller over the entire white polyester surface. A single hair or dust particle trapped under your transfer will create a visible white spot or streak on the finished product. This takes 10 seconds and prevents a ruined blank.
Step 2 — Place the mouse pad face-down onto your printed design Rather than cutting your design to the exact size of the blank, print your design on a full sheet of sublimation paper (or print slightly larger than the blank). Place the mouse pad onto the printed sheet with the white polyester surface facing down onto the printed side of the paper. The blank should be fully covered with no white edges showing.
Step 3 — Tape all four edges Use heat-resistant tape to secure all four edges of the blank to the sublimation paper. This prevents the paper from shifting during pressing, which causes ghosting — a blurry double-image effect that ruins the transfer. Tape every corner and the center of each edge for security.
Step 4 — Prepare your heat press Place a sheet of butcher paper or parchment paper on the lower platen of your heat press. This protects the platen from any ink that bleeds through the edges of the blank. Set your press to 385°F and allow it to fully preheat. Verify the temperature with an infrared thermometer if you have one — many entry-level heat presses run 15–25°F cooler than the display reading.
Step 5 — Press Place the mouse pad assembly onto the butcher paper on your press, with the sublimation paper side facing up and the blank rubber side facing down. Place another sheet of butcher paper on top. Close the press and apply medium-firm pressure. Press for 50–60 seconds.
Step 6 — Hot peel immediately When the timer goes off, open the press and remove the mouse pad immediately. While still hot, peel the sublimation paper away from the surface in one smooth motion. Do not let the paper cool while still in contact with the blank — cooling causes the sublimation gas to partially re-absorb into the paper instead of setting into the polyester surface, which results in faded colors.
Step 7 — Allow to cool flat Place the finished mouse pad rubber-side down on a flat surface and allow it to cool completely before handling or packaging. The colors will appear slightly more vivid once fully cooled.
Common Sublimation Mouse Pad Problems and How to Fix Them
Problem: Colors are washed out or faded Cause: Temperature too low, time too short, or press is not reaching the stated temperature. Fix: Verify your press temperature with an infrared thermometer. Increase pressing time by 10 seconds. Make sure your sublimation ink is not expired (sublimation ink has a shelf life of approximately 12 months after opening).
Problem: Ghosting — blurry double image Cause: The sublimation paper shifted during pressing. Fix: Tape all four edges AND the center of each side with heat-resistant tape before pressing. Never open the press and reclose it mid-press.
Problem: Bubbles or uneven areas in the transfer Cause: Moisture trapped in the blank. Fix: Pre-press the blank until zero steam is visible. Pre-press for multiple cycles if needed.
Problem: White spots or streaks Cause: Lint, dust, or hair on the blank surface before pressing. Fix: Lint roll the blank immediately before applying the transfer. Store pressed blanks in a sealed bag until use.
Problem: Colors look correct on screen but print too dark or too bright Cause: Color profile mismatch between your design software and your printer settings. Fix: Install the ICC color profile for your specific sublimation ink brand. Print a test swatch before committing to a full blank.
Problem: Design is reversed on the finished product Cause: You forgot to mirror the design before printing. Fix: Always mirror (flip horizontal) before every print. Make this a non-negotiable step in your workflow.
Sublimation Mouse Pad Design Ideas That Sell
If you plan to sell sublimated mouse pads on Etsy or at craft markets, these design themes consistently outperform generic options:
High-selling mouse pad themes:
- Personalized with a name and profession — “Dr. Sarah’s Desk” style designs sell year-round
- Pet portrait mouse pads — customers submit a photo of their dog or cat
- Inspirational quotes for home offices — “Do What You Love” style typography
- Astrology and zodiac themes — popular with younger buyers
- Seasonal and holiday designs — Christmas, Halloween, Mother’s Day, Father’s Day
- Teacher appreciation — especially strong in May and August
- Sports team themes — be careful with licensed logos; use generic sport themes instead
- Boho and floral desk aesthetics — extremely popular on Pinterest and Etsy
Pricing guide for selling mouse pads: A standard sublimation mouse pad blank costs $2–$4. With shipping supplies, your cost per unit is approximately $5–$6. Finished custom mouse pads on Etsy sell for $14–$28 depending on personalization level. Photo mouse pads (where the customer provides a photo) command the highest prices — $20–$30 — because of the perceived personalization value.
Free Mouse Pad PNG Design — Ready to Press
We have included a free mouse pad sublimation PNG design in our shop — sized correctly at 9.5 x 11 inches at 300 DPI, RGB color mode, transparent background, ready to open and print immediately.
All free designs from Sublimation Co. include a commercial use license — you can sell the finished physical mouse pads you make using this file.
What to Do After Pressing — Packaging and Selling
If you are making mouse pads to sell, presentation matters. Here is a simple packaging setup that looks professional without adding significant cost:
- Slide the finished mouse pad into a clear resealable poly bag (9 x 12 inch bags fit standard mouse pads perfectly)
- Add a small branded card with your logo and care instructions
- Care instructions to include: Wipe clean with a damp cloth. Do not machine wash. Avoid prolonged exposure to direct sunlight to maintain color vibrancy.
For Etsy listings, photograph your mouse pad on an actual desk with a keyboard and coffee cup — lifestyle photography dramatically outperforms white-background product shots in this category.
Frequently Asked Questions
What temperature do you sublimate a mouse pad at? The standard temperature for sublimating a neoprene mouse pad is 385°F (196°C) for 50–60 seconds at medium-firm pressure. Some blank manufacturers recommend 400°F for 40 seconds — always check your specific blank’s instructions and verify your press temperature with an infrared thermometer.
Do I need to mirror my design for a mouse pad? Yes. Always mirror (flip horizontally) your design before printing. Since you place the printed side face-down onto the blank, a non-mirrored design will appear reversed on the finished mouse pad. Any text, logos, or directional elements will read backwards if you skip this step.
Why does my sublimation mouse pad have bubbles? Bubbles in sublimation mouse pads are almost always caused by moisture trapped in the neoprene material. Pre-press your blank at full temperature for the full pressing time, watch for steam, and press again if steam is still visible. Only add your design once the blank is fully dry and cooled.
Can I use a Cricut EasyPress for mouse pads? A Cricut EasyPress Autopress or EasyPress 3 (the largest version) can press standard-size mouse pads. The EasyPress 2 is too small for a full mouse pad. For best results and most consistent temperature distribution, a swing-away or clamshell flat press is recommended for neoprene blanks due to the thickness of the material.
Can you sublimate on any mouse pad? No. You can only sublimate on mouse pads with a white polyester-coated surface. Standard rubber mouse pads, fabric mouse pads, and gel mouse pads will not accept sublimation ink. Always confirm the blank is specifically listed as a sublimation-ready mouse pad before purchasing.
How long does sublimation last on a mouse pad? A properly pressed sublimation design on a quality neoprene blank is effectively permanent under normal use conditions. Unlike heat transfer vinyl, sublimation ink is embedded into the polyester fibers rather than sitting on top — it will not crack, peel, or wash off. Color vibrancy may gradually reduce over several years with heavy use and cleaning.
Related Articles
Now that you know how to sublimate mouse pads, explore more sublimation projects and tutorials:
- Complete sublimation guide for beginners — start here if you are new to sublimation
- How to sublimate a 20oz tumbler — the most popular sublimation product for Etsy sellers
- Sublimation on cotton shirts — how to make sublimation work on 100% cotton
- Browse all free sublimation designs — free PNG files for tumblers, mugs, mouse pads and more
Want new free sublimation designs every week? Join our Facebook community — we share freebies, tips, and project ideas with crafters and small business owners every day.